First-time setup
The first time OverRec starts, the first-run guide opens. It has five steps and takes about five minutes at the PC.
To do it again later, open it from "Troubleshooting" → "Show the guide" in the settings window.
1. Turn on OBS's WebSocket
OverRec works OBS through OBS's WebSocket feature. Turn it on once in OBS.
-
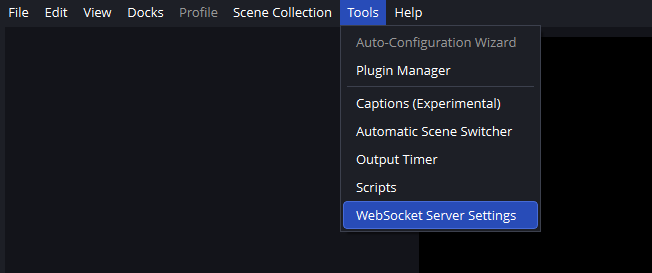
Open "Tools" in OBS Studio's menu.
-
Choose "WebSocket Server Settings".
-
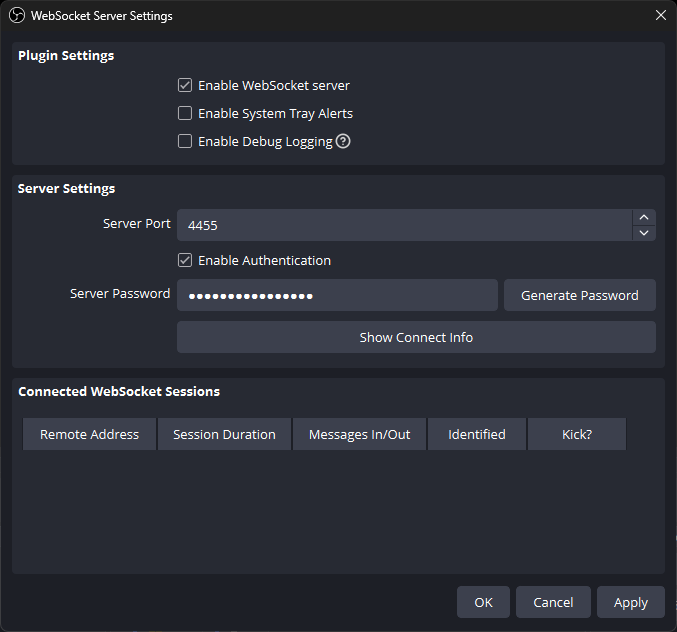
Check "Enable WebSocket server". Leave "Enable Authentication" on.
-
Press "Apply".
2. Connect to OBS
Enter what the same "WebSocket Server Settings" window shows into OverRec.
| Field in OverRec | What to enter |
|---|---|
| Address | Leave 127.0.0.1 when OBS is on the same PC |
| Port | OBS's "Server Port" |
| Password | OBS's "Server Password". It is hidden: see and copy it with "Show Connect Info" |
"Next" tries the connection before going on. If it cannot connect, the reason is shown there.
3. Replay and mic
- Replay buffer: the OBS feature behind "save the last few tens of seconds". Choose a length (30 s, 60 s or 120 s) and press "Set up in OBS". It changes OBS's output settings, so press once more to go ahead.
- Mic input: the OBS audio input that the panel's mic button mutes.
If saving a replay does not work after "Set up in OBS", restart OBS.
4. SteamVR
- Start with SteamVR: when on, OverRec starts when SteamVR does.
- Controller bindings: the buttons used without opening the panel (Controller bindings). You can set them later too.
This step can be set while SteamVR is running. If it is not, skip it and change it later in "General".
5. Using it in VR
Last, the guide shows how to use OverRec in VR. "Done" turns the window into the settings.
Go on to The basics.
After closing the settings window
- Minimizing the window puts it in the Windows system tray. Press OverRec's icon in the tray to open it again.
- Closing the window with "×" quits OverRec. To keep using it after closing, turn on "General" → "Closing puts it in the system tray".
- By default, OverRec quits when SteamVR does.